Deploying ML workloads with Azure and Kubernetes
05 Mar 2018Today we’ll be exploring deploying Machine Learning workloads to a Kubernetes cluster deployed on the Microsoft Azure cloud. The main focus of this is not a deep dive on the ML methods used, but to focus instead on the infrastructure considerations when deploying these types of workloads.
I’m currently looking for my next DevOps / Cloud infrastructure automation gig - this time focusing on Machine Learning. So it was a good time to try out these technologies used by many ML shops. For a video on how ML companies are using Kubernetes for their workloads check out Building the Infrastructure that Powers the Future of AI .
This post will cover the basics of pushing ML jobs onto a Kubernetes cluster. But we won’t cover more advanced topics like using GPU instances or autoscaling based on workload. I apologize for the terseness of this posting - its a long and complex process and so I’ve kept it terse to prevent it from becoming much too long!
My environment is a an Ubuntu Xenial VM with docker, Xwindows, and a web browser. If you do not have one of these you can spin up a Ubuntu/Xenial VM in Azure. The steps are the same for other flavors of Linux - but the command lines will differ.
All of my Dockerfile and Kubernetes configurations are available here: https://github.com/gregretkowski/kube-es-starter .
Intro to Evolution Strategies and Roboschool
The ML task we’ll be tackling today is to use Evolution Strategies to teach a bipedal robot to walk. A bit about Evolution Strategies from OpenAI:
We’ve discovered that evolution strategies (ES), an optimization technique that’s been known for decades, rivals the performance of standard reinforcement learning (RL) techniques on modern RL benchmarks (e.g. Atari/MuJoCo), while overcoming many of RL’s inconveniences.
My main interest in it is that it is a learning strategy that is well suited to being deployed as a distributed system, demonstrating some of the features of deploying to a Kubernetes cluster. It was straightforward to take the Evolution Strategies Starter Code and adapt it with a few modifications to be the experiment running on our cluster.
The environment our ES will train on is the Roboschool Humanoid task. Roboschool is a set of environments from OpenAI which replicate the Mujoco environments but use an open source physics engine, Bullet3. Because the cost for Mujoco licenses - the cheapest license available for anyone to run within a container is $2000 - the availability of Roboschool opens up experimentation with physics environments to a much wider audience.
What our implementation will look like
We will set up a Kubernetes cluster running in Azure. Our Kubernetes job will have a single master and many workers. Master and workers will run from the same Docker container image, differentiated by running a different startup script. The master will provide a Redis service for communicating to the workers. Result snapshots will be written out by the master to an Azure file share.
Working with a local container
The first step is to get things working locally. Creating and debugging our docker container locally allows us to quickly iterate. Once we have it working locally we can move onto deploying it at scale in a cloud service.
Creating the container
The workflow I’ve found most effective is to simply start with a base container in an interactive shell, and then run each command to set up your desired environment. I copy/paste the working command lines into my notes and use those notes to create the Dockerfile.
docker run -i -t ubuntu:xenial /bin/bash
> root@5fd5a12008ab:/#
apt-get update
apt-get dist-upgrade
apt-get install python3 python3-pip git build-essential
...
I ended up with a lengthy Dockerfile. You can read along with the Dockerfile on GitHub. The Dockerfile contains the following:
- Start with an Ubuntu Xenial container
- Update the OS and install build tools
- Install the Roboschool dependencies
- Install the Bullet3 physics engine
- Finish Roboschool installation
- Install an X11 virtual framebuffer
- Install evolution-strategies-starter & dependencies
- Install and configure redis, needed for the ES implementation
- Add our task definition JSON file
humanoid.json - Add startup scripts for master and worker nodes
Here’s a small part of the Dockerfile, setting up the ES starter.
# Install prereqs & evolution-strategies-starter
RUN apt-get -y install tmux screen vim
RUN apt-get -y install python3-click python3-redis python3-h5py
RUN pip3 install tensorflow==0.12.0
RUN git clone https://github.com/openai/evolution-strategies-starter.git
# Make it Roboschool compatible.
RUN sed -i "s|^    import gym$|    import gym, roboschool|g" /evolution-strategies-starter/es_distributed/es.py
RUN sed -i "s|^    import gym$|    import gym, roboschool|g" /evolution-strategies-starter/scripts/viz.py
Once we’ve finished editing our Dockerfile, we’ll create our docker image ala:
docker build -t gretkowski/kubeevo:v1 -f Dockerfile .
Testing and debugging the docker image locally
To test locally we’ll use docker to set up a test network, and then launch one master and one worker container. Chris Sainty has a good rundown of how to connect docker containers. We’ll use those instructions to create a docker network and connect our two containers over that network.
# start the master.
mkdir -p logdir
docker network create --driver=bridge testnet
docker run --net=testnet --name redis -i -t \
    -v `pwd`/logdir:/logdir gretkowski/kubeevo:v1  ./master-start.sh
# In a separate terminal window
docker run --net=testnet --name worker -i -t \
    gretkowski/kubeevo:v1 ./worker-start.sh
With the containers running we should be able to see the worker connect
to the redis server on the master. We should see the worker pick up
tasks from the master and push results up to the master.
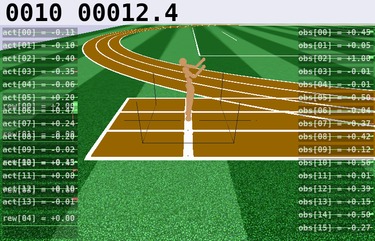
Showing results
We can even use the container we created to show the results of our experiments. The docker container can display visualizations based on the latest checkpoint file.. As long as we allow the container access to open up a window on our X11 display.
# NOTE - this opens up your X display to the world!
xhost +
docker run --net=testnet -i -t -v `pwd`/logdir:/logdir --rm \
    -e DISPLAY=$DISPLAY -v /tmp/.X11-unix:/tmp/.X11-unix \
    gretkowski/kubeevo:v1 /bin/bash
# Should now be in the container
ls /logdir/es_master*
# Note the name of the newest snapshot file for the next command...
python3 -m scripts.viz RoboschoolHumanoid-v1 \
    /logdir/es_master_201803051820/snapshot_iter00020_rew100.h5 \
    --stochastic
Once we are satisfied that everything is working as you expect, we’ll clean up our docker environment.
docker rm redis
docker rm worker
docker network rm testnet
Setting up the Azure Kubernetes cluster
The first step is to get an Azure account. Its easy to do, but you will need to have a credit card.
- Get the trial account, right now you get $200 in free credit.
- Upgrade it to the pay-as-you-go account unless you only want to use just a few very basic VM’s. You need to upgrade to get access to better VM’s.
Once you have your account established its a good time to familiarize yourself with the Microsoft Azure Portal.
Getting your Kubernetes cluster set up
The next step is to set up our Kubernetes cluster within Azure. For more verbose instructions check out the Azure walk-through for setting up Kubernetes.
First we’ll install the Azure CLI tool az and then install the
Kubernetes CLI tool kubectl. If you are running something other than
Xenial check out Installing the Azure CLI for instructions for your platform.
AZ_REPO=$(lsb_release -cs)
echo "deb [arch=amd64] https://packages.microsoft.com/repos/azure-cli/ $AZ_REPO main" | \
    tee /etc/apt/sources.list.d/azure-cli.list
apt-key adv --keyserver packages.microsoft.com --recv-keys \
    52E16F86FEE04B979B07E28DB02C46DF417A0893
apt-get install apt-transport-https
apt-get update && apt-get install azure-cli
We’ll verify the tools are working, by first logging in to Azure (requires a web
browser) and then doing an acr list command
az login
az acr list
We need to create a resource group to contain all of our Kubernetes resources, this also makes it easier later to delete all our resources in one go, rather than having orphaned resources racking up your bill.
az group create --name myResourceGroup --location west-us-2
az acs create --orchestrator-type kubernetes \
    --resource-group myResourceGroup --name demoKubeCluster \
    --agent-count 1 --generate-ssh-keys
Next we’ll get kubectl installed and configured to talk to your cluster:
az acs kubernetes install-cli
az acs kubernetes get-credentials --resource-group demoKubeGroup \
    --name demoKubeCluster --file `pwd`/kubeconfig
export KUBECONFIG=`pwd`/kubeconfig
kubectl top node
Setting up a private container registry
We need to have a place to put our docker images that Kubernetes can retrieve them when deploying. To do this we’ll deploy a private container registry within Azure.
az acr create --resource-group demoKubeGroup \
    --name demoKubeRegistry --sku Basic
az acr login --name demoKubeRegistry
We’ll try to push an image into the registry, just to verify everything is working.
docker pull microsoft/aci-helloworld
docker tag microsoft/aci-helloworld demokuberegistry.azurecr.io/aci-helloworld:v1
docker push demokuberegistry.azurecr.io/aci-helloworld:v1
az acr repository list --name demoKubeRegistry --output table
Pushing your container image into the registry
Now is a good time to push our container to the registry. To do that we will tag the container with the remote registry hostname, and then push the container.
docker tag gretkowski/kubeevo:v1 demokuberegistry.azurecr.io/kubeevo:v1
docker push  demokuberegistry.azurecr.io/kubeevo:v1
az acr repository list --name demoKubeRegistry --output table
Azure file service setup
To get results out of our experiment we need our master node to write out checkpoints to a place which is easy for us to access. To accomplish this we will have our master node attach a volume which maps to an Azure File Share. We can then download checkpoint files by browsing through the Azure console.
The implementation is a mix of the one provided in Francisco Beltrao’s post and Karim Vaes’ post
az group list --output table
# Note the long one associated with your Kube cluster

az storage account create \
    --resource-group demoKubeGroup_demoKubeCluster_westus2 \
    --name kubeevologdir --location westus2 --sku Standard_LRS
az storage account show-connection-string \
--resource-group demoKubeGroup_demoKubeCluster_westus2 \
--name kubeevologdir

az storage share create --name kubeevologdir \
    --connection-string "THE_CONNECTION_STRING_FROM_THE_LAST_CMD"

az storage account keys list \
    --resource-group demoKubeGroup_demoKubeCluster_westus2 \
    --account-name kubeevologdir --query "[0].value" -o tsv
# Note the 'storage key' for the next commands.

# These values go into secrets/secrets/kubeevologdir.yaml
echo -n kubeevologdir | base64
echo -n {enter the storage key} | base64

# Now create our Kubernetes resources
kubectl create -f secrets/kubeevologdir.yaml
kubectl create -f pv/kubeevologdir.yaml
kubectl create -f pvc/kubeevologdir.yaml
Now kubectl get persistentvolumes and kubectl get persistentvolumeclaims
should indicate the volume is ready to use.
Starting up our ‘master’ container
Read through the definition of our master master.yaml. Some of the highlights here:
- It uses the container image we uploaded to our private registry
- It defines a port
6379, opened up for Redis - It mounts the
kubeevologdirvolume on/logdir - The startup command is the
./master-start.shscript
We’ll start up our master, and monitor its progress:
kubectl -f deployments/master.yaml
kubectl get pods
kubectl describe pods master
Hopefully you end up with a pod in the Running state. If not the describe
argument will often have some indication on why the pod failed to start.
You can check out the logs from the running container using the logs argument
and the pod name, i.e. kubectl logs master-1285880246-1x227. To login to
the pod to debug something locally use
kubectl exec -it master-1285880246-1x227 -- /bin/bash .
Starting our workers
The master is running Redis, but to make that available to workers we need to tell Kubernetes that its a ‘service’ - which creates a DNS name the workers can reference.
kubectl create -f services/redis.yaml
Next we can start up a couple of workers
kubectl create -f deployments/workers-2.yaml
Using kubectl logs should show the workers connecting to the master and
pulling down tasks:
kubectl logs worker-3207115605-v0lwh
...
[2018-03-06 23:06:43,344 pid=34] [relay] Received task b'0'
Scaling up the cluster & adding more workers
Next lets scale up the number of nodes in our Kubernetes cluster, and then add several more workers. When we created the cluster we only added a single agent. We then only launched 2 worker containers. Here we’ll scale up to have a total of 4 agents, and 8 workers.
az acs show --name demoKubeCluster --resource-group demoKubeGroup
az acs scale --name demoKubeCluster --resource-group demoKubeGroup --new-agent-count 4
kubectl replace -f deployments/workers-8.yaml
kubectl get pods
Checking out progress, and grabbing results
If you run kubectl logs for your master you should see the experiment
chugging along…
********** Iteration 2 **********
[2018-03-06 23:12:18,352 pid=29] Skipped 25 out of date results (1.15%)
----------------------------------
| EpRewMean           | 32.7     |
| EpRewStd            | 13.1     |
| EpLenMean           | 32.7     |
| EvalEpRewMean       | 44.2     |
| EvalEpRewStd        | 14.6     |
| EvalEpLenMean       | 39.3     |
| EvalPopRank         | 0.746    |
| EvalEpCount         | 6        |
| Norm                | 501      |
| GradNorm            | 0.701    |
| UpdateRatio         | 0.0737   |
| EpisodesThisIter    | 1e+04    |
| EpisodesSoFar       | 3.04e+04 |
| TimestepsThisIter   | 3.27e+05 |
| TimestepsSoFar      | 8.39e+05 |
| UniqueWorkers       | 8        |
| UniqueWorkersFrac   | 0.00368  |
| ResultsSkippedFrac  | 0.0115   |
| ObCount             | 3.69e+03 |
| TimeElapsedThisIter | 83.7     |
| TimeElapsed         | 765      |
----------------------------------
********** Iteration 3 **********
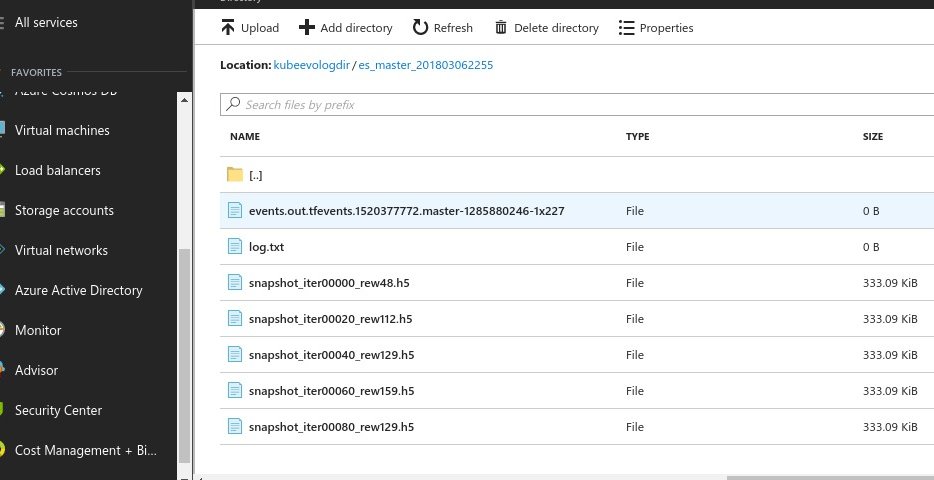
The experiment will write out checkpoint files every 20 iterations. To
access the files the most expedient way is to browse through the Azure
Portal. Go to ‘Storage Accounts’ then drill into kubeevologdir, ‘files’, kubeevologdir.
You can then take those h5 checkpoint files and use the scripts.viz command line
we used previously to look at the progress of the experiment in learning a solution.
And finally, saving our bank balance
After we have finished using your Kubernetes cluster, we’ll be sure to clean it up - making sure it doesn’t continue to rack up big charges for VM’s and other Azure resources. A big plus is that Azure kept all our resources in a ResourceGroup so to clean everything up we can simply delete that group:
az group delete --name demoKubeGroup